|
|
Developer's Tip - PrelightingWhat is prelighting? Prelight is an optional argument used on the Vertex command to "light up" individual vertices in an object. Why prelight? You may be thinking; since Active Worlds has had the light command since 3.1, wouldn't the prelight command be obsolete? Put simply, NO! There are many reasons why prelighting is still a very important tool for your 3D modeling, such as:
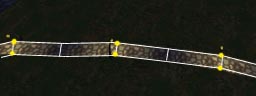
Because light sources take extra processing power to render, having too many of them in a world can severely impact your frame rate. The solution? Prelighting! Here is an example: Lets say that I want to make a path, which runs along the ground and has lampposts at set intervals along the way. In order to achieve the effect that I want with the light command I will need a light source under each and every lamppost there. Pretty heavy. Instead, I might choose to prelight the path at the points underneath the lampposts along the way, like this: 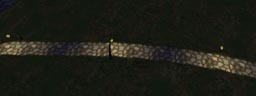
The lampposts themselves can show us how we can use prelighting for light sources and for detailed lighting. 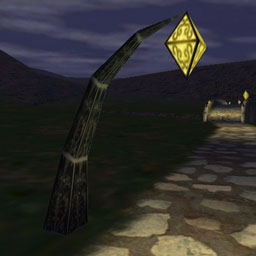 Notice how the lamp is nice and bright while the world around it is dark, just like a good lamp is supposed to act. Since the lamp is supposed to look like it is emitting light, we don't want it to darken with the world lights. The diamond shaped lamp portion of the object is fully prelit (white) so that no matter what your world lighting is set at, the lamp will be bright! Also notice how some detail lighting was given to the post of the lamp. The polygons close to the lamp were given subtle prelighting. In the daytime this small amount of prelighting will not even be seen because of the bright world lights. However at night we can see that the pole is lit a little bit by the light, just like it should. Combined with the path, we now have a beautiful nighttime scene that is more finely tuned and cheaper to render than a light source. You can also use prelighting in conjunction with light sources to great effect. Lets say we have a big glowing sphere that has a light command on it. The object itself is dark because the light is coming from its center and is not hitting any of its polygons. If you also prelight the object, it will look bright AND will emit light because of the light command! How do I prelight? In Truespace prelighting is fairly simple. Under the paint menu is a tool called paint vertices. Simply select the tool, select the color you want to paint, and click on the vertices you wish to prelight. (In order to get the color selector you may need to select plain color painting from the shaders menu. Right click on the paint objects button in order to get the shaders menu.) Remember, white will be fully lit, black will be no prelighting, and anything in between will tint the object with that color. Also if RWX is your thing, you can manually prelight vertices in the RWX file. Here are the details: https://www.activeworlds.com/help/rwx_vertex.html I hope this helps in your quest for better and more realistic looking worlds! -Oleyo
|
| Active Worlds | Newsletter Home | Newsletter Archive | Contact Us | Disclaimer |