
|
|
Artist's Tip - Simple Clouds TutorialCourtesy of XelaG With the recent release of 3.4, this month we have decided to re-run the Artist's Tip from the February AWNewsletter, where Active Worlds citizen XelaG shares a simple way to make Cloud Layers, one of the new features of the upcoming version 3.4, using PaintShop Pro 7. Simple Clouds TutorialHow to make a simple clouds layer in PaintShop Pro 7Your goal in this tutorial is to make a JPG and a BMP mask for it, that can be used as a 3.4 clouds layer. The method explained here is basic and will allow you to make simple but effective clouds for your new 3.4 world. Open PaintShop Pro 7 and make sure the following toolbars are visible: Standard Palette, Color Palette, Tool Options and Layer Palette. If they aren't, go to the menu View | Toolbars and make them visible there. Make a new image with File | New. Select a size of 512 x 512 pixels, with transparent background and 16.7 million colours (24 bit). This size is excellent for working on, later you can reduce the final image to 256 x 256 if you wish to save memory (recommended!). The Sky layerOpen the Layer Palette by clicking on its title bar, right-click on the 'Layer1' label and select Rename. Rename it to 'Sky'. 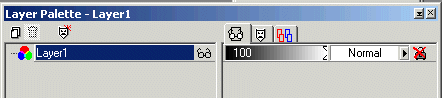 before renaming 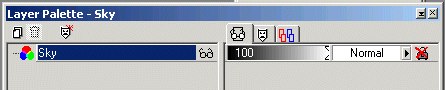 after renaming Make a new layer on top of the Sky layer. Open the Layer Palette, right-click on 'Sky' and select New raster layer. Accept the default settings, but change the name field to 'Clouds'. A new layer is created called Clouds. If you are new to layers, you will notice that the active layer is highlighted in the Layer Palette: this is important, because you always work on the active layer. Only one layer is active at a time. You can activate a layer by clicking on its name. The name of the active layer is also visible on the title bar of the image. You have now two layers, always make sure you are working on the right layer! 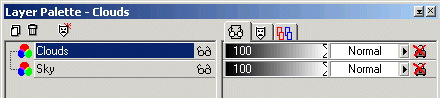 two layers, the Clouds layer is active Activate the Sky layer by clicking on its name in the Layer Palette to highlight it (check the title bar of the image to confirm this). Select a Styles foreground colour, for example, a deep blue, by clicking on the topmost Styles button (not on its triangle). Make sure that the Styles are set to solid  Select the Your Sky layer is now blue. This is a good colour on which to work, as clouds will stand out well when you paint them. You will change this colour at the end to a more subtle one, that matches the clouds. 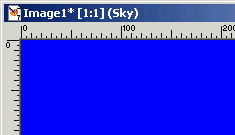 the Sky layer (fragment)
The Clouds layerActivate the Clouds layer in the Layers Palette. This layer is transparent, you will paint the clouds on it. Prepare your tools. You will use the air-brush, painting with a colour mixed with a texture.
Select the 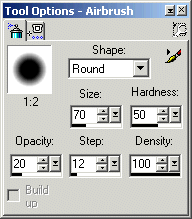 Tool Options, Air Brush You need a foreground Texture. Click on the small triangle on the foreground Textures button, and select Texture 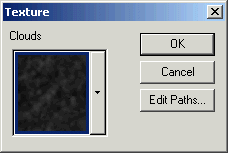 the Texture selector  the foreground Textures button, after selection The colour. Start by using darker colours first. Select in Styles a medium grey colour for the foreground, for example, #C0C0C0. This will form the base colour that you will use to paint the shape of your clouds. Start painting the clouds, using strokes while holding down the mouse button, or holding the button without moving the mouse: each of these methods produces a different effect. Stay away from the edges of the image. Use the Edit | Undo menu if you make mistakes. 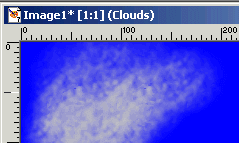 the Clouds layer (fragment) the blue Sky layer is seen beneath it Once you have your general shape, change the foreground Styles colour to white, and decrease the size of your airbrush to 25. Add highlights to most of the clouds, leaving some of their edges dark. You can use other settings and tools too. I like the Retouch tools Smudge and Push (keep the opacity very low here, like 4). Or drop a shadow (use an appropriate colour, like pink for a dawn sky). But for this tutorial, let's keep it simple :) Save your work frequently, always save in PSP format. When you are satisfied of certain changes, save them and then save again under a different name (do not use Save As, just Save). This will keep backups in case you make a mess!
The Finishing Touches: your JPGFor this simple tutorial, you will end up by changing the colour of the Sky layer. You will need to select one that will show nicely through cloud edges of the BMP transparency mask (which you will make next). For example, a very light pink might do: #FFDDDD. Activate the Sky layer. Change the colour of the foreground Styles to your new colour, and set the Textures to null 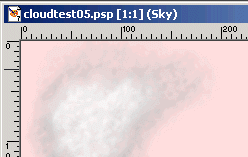 the light-pink Sky layer, final colour (fragment) the Cloud layer is seen above it Save your work, and duplicate the image (menu Windows | Duplicate). Close the original image you just saved, keeping the duplicate. Select Image | Resize, and resize to a pixel size of 256 x 256, using Smart Size resize type. Save this resized duplicate as a JPG with the name you will use in Active Worlds. The BMP MaskYou now need to make a BMP transparency mask for your clouds, so that only the coulds in the image are rendered, and the rest becomes transparent and shows your skybox or sky colours. Duplicate again the file that you just saved, and close it, keeping the new duplicate. You will use this duplicate of your image to create a greyscale mask. Activate the Sky layer, and Use the menu Colors | Gray Scale to change your image to a 256 greyscale one. Activate the Clouds layer. You need to adjust the brightness and contrast of this layer so that it allows your clouds to be seen properly (white does that, black makes your image transparent, greys are in between). Select the menu Colors | Adjust | Brightness/Contrast. To see what you are doing, press down Auto proof and Proof. Adjust brightness and contrast so that they have positive values. Try, for example, brightness 60 and contrast 10. You may need to experiment a few times before you get the result you want. What you are looking for is white areas for the clouds with greyer shades for the edges and semi-translucid cloud areas that will fade into the full transparency of the black Sky layer.  before and after adjusting the brightness and contrast of the Clouds layer (fragment) Once you are satisfied and have accepted the changes, save this greyscale image both as a PSP file, and as a BMP file you can use as mask. In this way, you can always use the PSP file again to make adjustments and create a new BMP file.
Very Short SummaryOn a 512 x 512 24-bit canvas with two transparent layers, paint the bottom layer blue, on the top one paint the clouds, using a texture-coloured air-brush spray and other tools. When done, adjust the colour of the bottom layer to match that of the clouds. Resize to 256 x 256. That's your JPG. Use a copy your image to create a greyscale mask. The transparent area is black (the bottom layer), the cloud area is white with shades of grey for transparencies. The mask must be converted to a 256-greyscale image. That's your BMP mask.
Remarks and TipsI suggested you stay away from the edges of the picture. This is a simple way to ensure that the image will tile properly in the world sky, which is important if you apply a tiling factor other than 1, or if the clouds are moving. There are ways of tiling an image (beyond the scope of this tutorial) which allows you to paint the edges of the image. Basically, once painted, the image is split vertically in the middle and the parts are swapped, so that what was the edge is now the middle. The centre of the image is retouched so that it becomes continuous. Then the same is done again using a horizontal split. The procedure is repeated until no more retouching is needed. You can use more than one transparent layer to paint clouds. The minimum is one 'Clouds' layer, never use the 'bottom' Sky layer for this. When you are ready painting the clouds and you change the colour of the Sky layer, you can if you wish edit this colour: it need not be uniform whitish pink. But it is easier to use a uniform colour on this layer, and to paint whatever is needed on different Cloud layers. Always give your layers a meaningful name. This allows you to see better on which layer you are painting. You can change the order of layers by dragging them in the Layer Palette (the Sky layer must remain at the bottom). Save frequently. Duplicate images whenever you wish to make changes that should not affect the original image. This saves you a lot of trouble! Make your BMP mask at the end, once your clouds are done and the image has been resized. You can download here an example I made in a few minutes, using exactly the method I explained in this tutorial, although some of the settings may differ slightly. This basic method can be refined in many ways, but the major steps shown here remain valid. Finally, if you have any tips I could use, contact me at xelag@3dee.nl :) XelaG P.S. Don't email me to tell me it's gray and not grey, color and not colour, thru and not through :)
|
| Active Worlds | Newsletter Home | Newsletter Archive | Contact Us | Disclaimer |