In this article:- Using AWG files
- Capturing more than 128 objects in an AWG file
- Using AWGs from the Groups Folder in an object path
- AWGs as ground objects
- Reader questions
What exactly IS an .awg file? AWG stands for "Active Worlds Group" file. It's a format that allows you to save a build of objects, particles, zones, and movers all together into one handy file that you can then recall later and replicate as often as you like. It will also save all commands on those objects. It's a great way to save copies of your builds, and it provides a way to replicate a build quickly for in-world use (an example would be to provide pre-built homes for others to live in without building each one from scratch). It's a new feature that may at first seem very confusing, but we're going to break it into a few steps here and help you take advantage of this powerful building tool.
1. First step: Determining where you want the center point of your build to be.
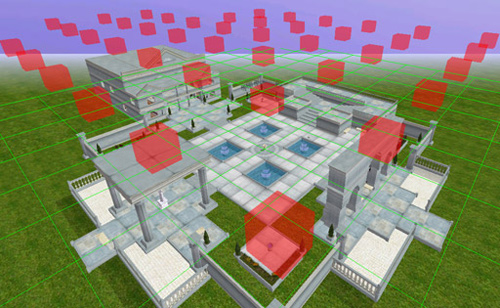
The center point of your build does not have to be the exact center of it. You can choose where you want it to be. Take a look at the picture below. This is a complete build I'm hoping to save as an AWG preset. The entry point where people come in right now is not in the very center of the entire build, but instead where the sundial is positioned between the four fountains. I've decided I would like this to be where the axis for my build is. I click on the floor panel that is positioned at that spot.
 |
| Click image for a larger view. |
Note the X, Y, and Z coordinates for this object's location. Copy the numbers down: you are going to need these later to set your axis point for your AWG preset. The numbers I want to write down are x 0.00, y 0.05, z 0.00. The item I chose happened to be near the center of the world. This will not always be the case.
2. Second step: Setting up our build so we can select everything.
If you've ever attempted to hand select everything in a build, you know the frustration that can result. Furniture inside a home can accidentally be left out in the process. Things on the fringe might be overlooked. There has to be an easier way, and there is. Pick a simple object from the objects in your path, such as a cube, that is large enough for you to see and easy to work with at a distance. (p2cube0200.rwx is a good object for such use in the AlphaWorld path and soundsrc.rwx in the MegaPath). Turn the cell grid on with the F10 button. Place a cube in the middle of one of the cells that your build occupies, but high enough above your build that it is easy to click on. Repeat this for every cell space your build occupies. It is 20 clicks from the center of one cell to the next.
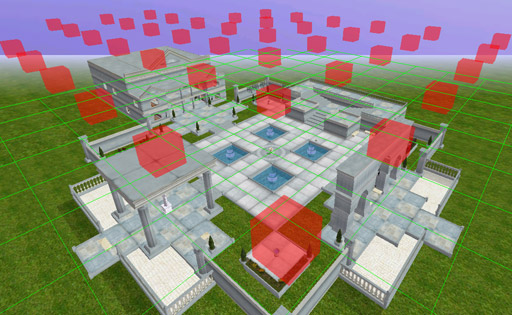
I duplicated my center floor piece and made it into a cube. This put the cube in the center of 4 cell spaces. I then moved my cube 10 clicks north, 10 clicks west. Voila! It's in the center of a cell. I could then fill all the cell spaces above my build, all 42 cells in this case. Not sure if a cell needs a cube? Build one inside, then hold shift and control down when you select your cube. If it is the only thing that ends up being selected, you won't need the cube in that cell.
And this is what I ended up with. Pretty, huh? Cubes in place and ready for the next step.
 |
| Click image for a larger view. |
3. Third step: Selecting your entire build.
Hold down Shift and Ctrl and begin selecting your cubes. Each cube you select will automatically select all the objects below it that are found in that cell space. Your entire build will then be selected by the time you reach your last cube. Release the Ctrl button but keep the Shift depressed and now go back and click on your cubes. This will allow you to unselect the cubes (which you probably do not want in your finished .awg file) while having the entire build below them still selected.
4. Fourth step: Positioning your axis
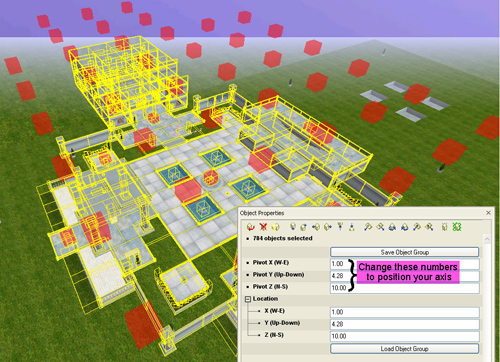
Note in the Object Properties Box there are two sets of numbers; first set is for the pivot point, the second is for location. The only ones we are going to alter are the ones for pivot. The pivot point will set the center point of our build. The pivot point is automatically calculated based on the average of all the axii positions of every object you have selected.
 |
| Click image for a larger view. |
This is not where we want our .awg file to be based from though. We chose a different spot and wrote those coordinates down. Get those out now and transfer those numbers into the Pivot X, Pivot Y, and Pivot Z. You'll be able to see the pink axis move to the position you wanted, in this case, for me, it moves on top of the sundial. Do not hit the Enter key after any of your additions or it will close the Object Property Box and you will have to redo the Third Step. We have our build ready to save.
5. Fifth step: Save the file
Click "Save Object Group" and a new window will open that allows you to type in a name for your .awg preset. When you've named it, click the "Open" button (this is a misnomer, as it does not "open" your file but instead saves it) and when the window disappears, the Building Inspector will alert you to the fact that your .awg preset will have been saved into the "Presets" subfolder in your AW browser folder. You can close the Object Properties Box now.
6. Sixth step: Recalling your .awg file
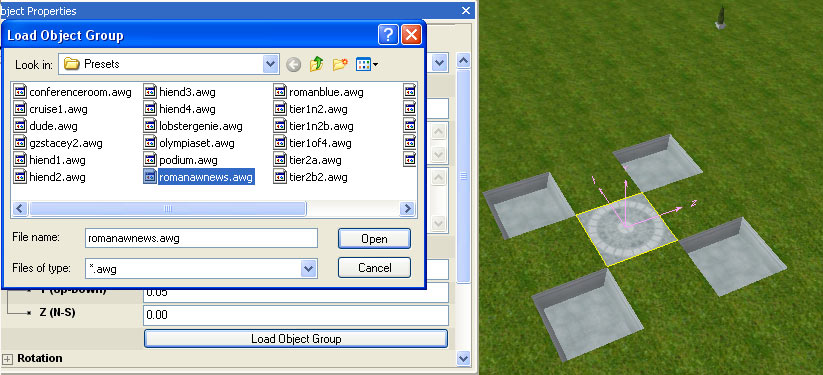
First set up an object in the spot where you want your .awg file to build from. The object can be anything. The center of your build will line up with the axis of this object so make sure it is where you want. Keep in mind that rotation of the object is irrelevant. An AWG preset will only appear in the exact rotation it was originally saved. So if your house was facing north when you saved it as a preset, it will appear north when you reload it, regardless of the fact that the starter object you built it from was facing south. Below is a picture of how I set my starter object up.
 |
| Click image for a larger view. |
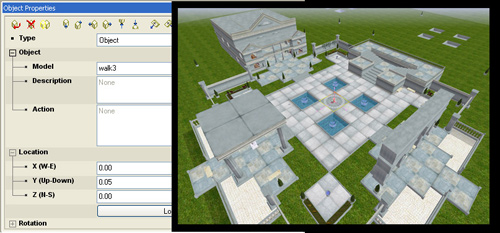
In the Object Properties Box you'll notice under the Location coordinates a button marked "Load Object Group". Clicking this will open a window that shows you the .awg presets you have in your folder. Select the one you wish to rebuild and click "Open". Depending on the size of your file, it may take awhile to load. How will you know if it's done? The build will pop into view all at once. You will not visibly see it building each piece. Once it has, you'll note that the Object Properties Box is still open... this is normal. Your initial object will still be selected. Since we no longer need it, you can delete it. And there it is, it worked! A perfect recreation of the build.
This whole process will feel a bit awkward in the beginning, but the more you practice it, the easier it will become until it's second nature. And you'll be able to keep small copies of your most treasured works right at your fingertips.
The great thing about doing things in Active Worlds is that there are usually several ways to accomplish your goal. In my research I came upon another great tutorial on AWGs that you might find useful, linked below.
SW City Builder's Academy AWG Guide:
https://www.swcity.net/academy/index.php?n=Main.CenteringAWGs
Selecting more than 128 Objects for Your AWG
When the ability to make an AWGroup first appeared, there was excitement about now having the ability to quickly and easily mass-produce a congregated group of objects. But a frustrating limitation was quickly discovered: object selection had a maximum limit of 128 objects and most builds went over that. A new feature was introduced for AWGs to expand the count from 128 total object selection to 1024. But it is not an automatic feature that was built in, it's one that needs to be added manually. The reason for that is due to the care that is needed when using this feature. It is strictly for selecting objects to save as a group. An attempt to grab 1024 objects and MOVE or otherwise alter them will probably result in your browser crashing and possible corruption of your build. Keep that in mind when doing your builds after adding the below line of code.
To allow your browser to select up to 1024 objects for an AWG, add the following line under the [special] category on the aworld.ini file located inside your Active Worlds folder.
max_pick_count=1024
Save your aworld.ini file and restart the AW browser.
Those on a slower internet connection could have problems saving AWG files with numbers that get close to the 1024 limit. Also note, that the larger number of items in your .awg preset, the longer it will take to load when it is recalled. It may take several minutes for it to load (I clocked about 2-3 minutes for a build approaching the limit of 1024 - results will vary).
Using AWGs From the Groups Folder in an Object Path
It is also possible to use .awg files with the "group" command.
Make a subfolder in your object path labeled "groups". Zip your individual .awg files and load them into this new subfolder.
Once that's done, you need to position a starter object where you would like the center position of your group to appear---this object can be anything. Next, put the command "create group <nameofgroup>" on the object in the action field. The .awg suffix is not required. Your group should appear. If you want the starter object not to be seen or felt, add on the command "visible off, solid off" and the starter object will disappear, while the group will remain.
To delete a group created in this way, you must delete the starter object. Keep in mind that you cannot right-mouse-click on a group, only it's starter object, so this is where the "build mode" button on the toolbar will come in handy for finding your starter object once it's been hidden. While you can not select the group, you still will be able to interact with objects in your group, such as "activates", movers, etc.
Using AWGs for the Ground Object in a World
Groups also provide an easy way to make sprawling ground objects in your world. A really good tutorial detailing how you can do this was written and posted here: https://forums.activeworlds.com/showthread.php?t=8646
Questions from Readers
1. Is it possible to get an object to look smooth (so a sphere looks smooth instead of polygonal) in Active Worlds?
Two things will help you achieve these results. First, go into the .rwx and do a search for all the instances of "LightSampling", and change the ones that have "Facet" to "Vertex".
Second is a recently added seamless command for rwx. A "seam" occurs where vertexes end up having two or more different UV values. Prominent examples of this show up on avatars and spheres. This command eliminates those seams. Below is an example of how to place this command in the rwx file.
ClumpBegin
Rotate 0 1 0 180
Rotate 1 0 0 -90
Scale .1 .1 .1
Seamless On
ProtoInstance object_002_1_6
ProtoInstance _6_5
ProtoInstance _5_4
ProtoInstance _4_3
ProtoInstance _3_2
ProtoInstance _2_1
ProtoInstance _1_0
ClumpBegin
ProtoInstance cylinder_0_8
ProtoInstance cylinder_2_7
ClumpEnd
ClumpEnd
ModelEnd
These pictures demonstrate how the "Seamless On" command can improve the look of an object with "seams". Note the cement orb in the lower left of each picture.
 |
| Click image for a larger view. |
2. What is the list of possible implicit sequences that are available for use in an avatar.dat file?
The list as it stands is Walk, Run, Wait, Endwait, Idle, Fly, Hover, Fall, Jump, Swim, Float, Warp, Slide1, Slide2, and Slide3. Climb is inoperative at this time.
|