With the phasing out of support for the modeling program trueSpace, many of us have gravitated toward other programs to model with. One such program is Blender 3D, and up until now, there was no easy or nice way to export a model directly from Blender into a format that Active Worlds could use. Thus began the process of Oleyo writing an RWX exporter for this mighty program. But as they would say, "Hey, share the wealth!" We here announce the release of this exporter along with some documentation for the features that have been incorporated into it. Long live Blender!
Download Blender RWX Exporter (From Activeworlds, Inc.)
Installation
To use this RWX exporter, simply place the .py file into your Blender scripts folder in your Blender directory. By default this directory is YourBlenderFolder/.blender/scripts, however the scripts folder may be in a different location depending on the options you selected while installing Blender. For example, you may choose to put Blender user settings in your Windows user's home folder, in which case the scripts folder would be there.
The next time you start Blender the exporter will appear in the File>Export menu under the name "AW RWX".
Exporting Overview
Blender objects may be exported into the RWX format simply by selecting one of several Blender objects in your scene and using the AW RWX exporter in the File>Export menu. Type in the filename that you wish the RWX to be called and click "Export". Be sure to include the ".rwx" extension in the filename, as the exporter will not do this for you!
Warning!
The exporter will overwrite any file with the same name in this directory, without confirming! Always back up your files and double check the name to avoid losing data!
Also, the exporter will export every selected object in the current Blender scene, this includes objects in non-visible layers! Be sure that you don't have extra objects selected in non-visible layers.
Each time the Exporter is run, only ONE rwx file is created. If multiple Blender objects are selected, they will each be added to the rwx file as a separate RWX Proto definition, which are referenced as ProtoInstances in RWX Clumps at the end of the file (essentially separate Blender objects become separate RWX "clumps" in the same object).
The scene location of each Blender object is ignored during export. Also ignored is objects' scale. If an object is to export as expected it must have an unmodified scale of "1" in all dimensions.
Things to look out for
The exporter does not currently handle errors gracefully and will crash in certain conditions. Here are a few things to avoid:
1) Only select Blender mesh objects while exporting. If other object types are selected (lamp, empty, armature) then the exporter will crash.
2) Be sure that no Blender objects or Blender materials use special characters (eg, #$%/) in their name.
Special Options
Several Blender settings and data are used to define various RWX calls or parameters, as follows:
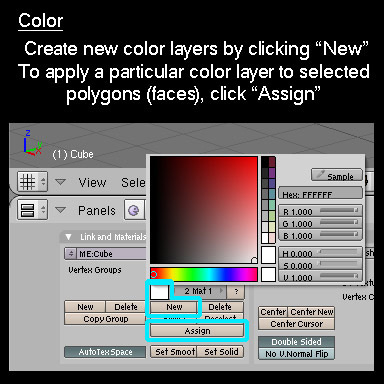
Color and Opacity
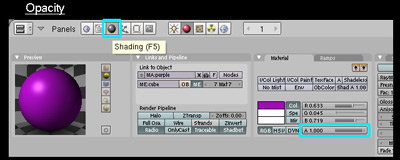
The exporter will set the color and opacity of each face according to the RGB and Alpha values of the Blender Material assigned to that face. These values are found in the "Material" pane of the "Shading" (F5) button panel. Also, a comment naming the current Blender Material is written in the RWX before these values are set, for reference.

Textures
The exporter will assign RWX texture references based on the name of the Blender "Image" datablock assigned to each face of the Blender object. By default the Blender "Image" name is the same as the filename of the actual image referenced, but it need not be. Therefore, be sure the Blender "Image" names match the filenames of the textures used.
The full Blender "Image" name is used, including the file extension, so .png and .gif images will be properly referenced in the RWX file.
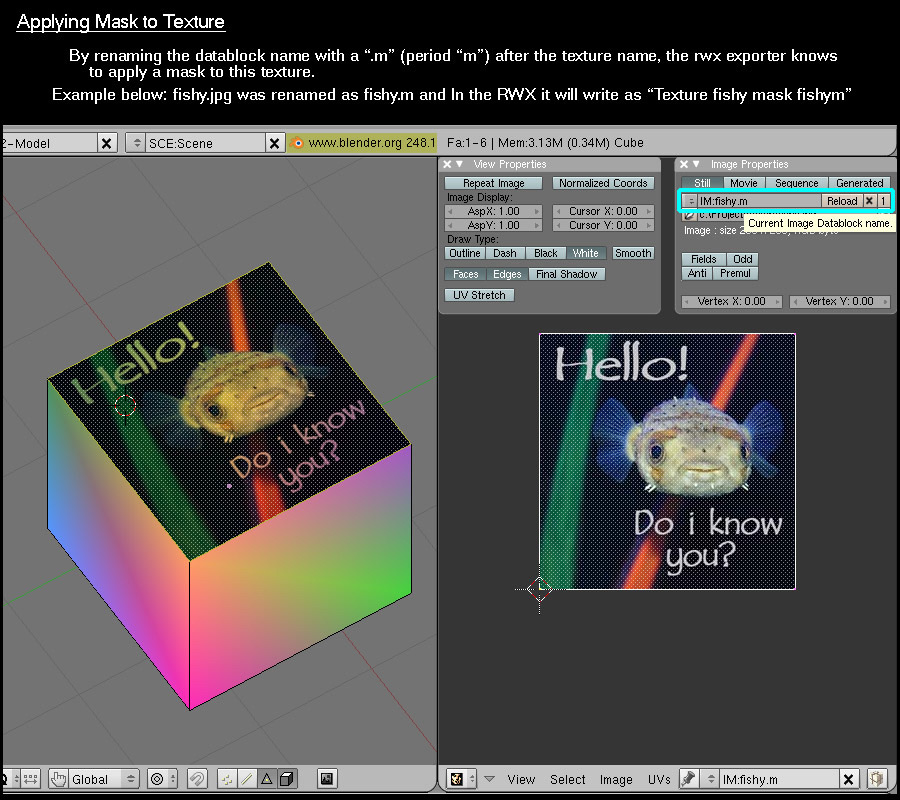
Masked Textures
A special feature is included to easily define textures that use a separate BMP image as a mask. Though these textures are not normally used by Blender (and will not be displayed in the Blender UV editor), they are used extensively by AW.
To define a texture as a mask, simply rename the file extension of the Blender "Image" name to ".m" and the exporter will place an AW-friendly texture mask reference in the RWX file.
For example, the Blender "Image" name:
"MyTexture.m"
will be referenced in the RWX automatically as:
"MyTexture mask MyTexturem"
in the correct format that Active Worlds will understand to mean the texture "MyTexture.jpg" and the mask "MyTexturem.bmp"
*Remember that the Blender "Image" name does not need to match the filename of the actual texture referenced. This can be handy in the case of masked textures, where the Blender "Image" can use the special ".m" extension, but still call the normal .jpg, .png, or other texture.
In this manner a "correct" texture can be seen on the Blender object while still calling the AW friendly masked texture inside the RWX file.

Prelighting
RWX prelighting is applied according to the Blender object's vertex coloring. Each vertex will be prelit with the same color as that Blender vertex's color (if any). Vertex colors are applied in "Vertex Color" mode in Blender.

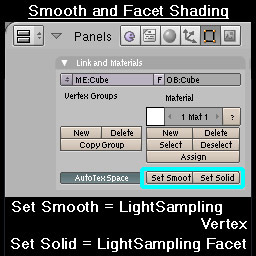
Shading
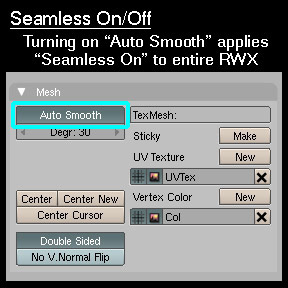
RWX faces will be shaded with vertex or facet shading as they are shaded in Blender. Additionally, if any Blender object has the "Auto Smooth" option turned on ("Mesh" pane of the "Editing"(f9) button panel), then the Active Worlds RWX extension "Seamless on" will be applied to the entire model.
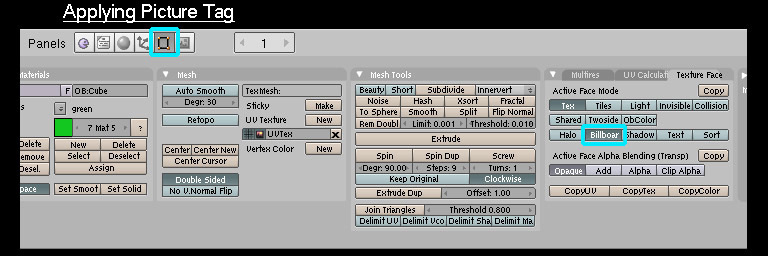
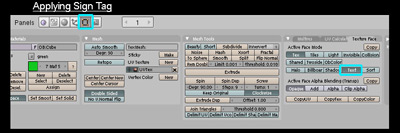
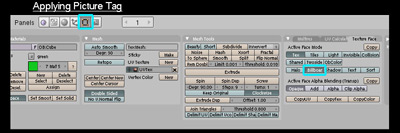
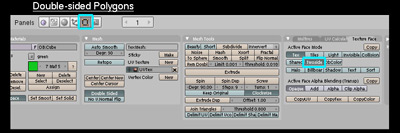
Face Tags
Certain RWX face properties may be defined by activating a corresponding Face Mode option in Blender. Blender Face Modes are accessed in the "Texture Face" pane of the "Editing"(f9) button panel, which is only visible in "Edit Mode"(Tab), and only if the active Blender object has UV's assigned.
Default UV's are automatically assigned when textures are applied, or can be manually assigned (if you want to tag faces, but don't want texture) in the "Mesh" pane of the "Editing"(f9) button panel by clicking "New UV Texture".
The following RWX conditions can be defined on a per-face basis by activating the corresponding Face Mode options in Blender:
Sign (tag 100) - An RWX face can be tagged to accept the AW "sign" command by selecting the "Text" Face Mode option in Blender for the active face.
Picture (tag 200) - An RWX face can be tagged to accept the AW "picture" command by selecting the "Billboard" Face Mode option in Blender for the active face.
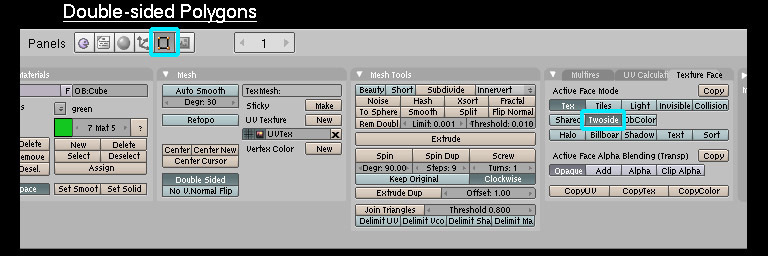
Double-Sided Face (RWX "MaterialMode Double") - An RWX face will be rendered double-sided by selecting the "Twoside" Face Mode option in Blender for the active face.
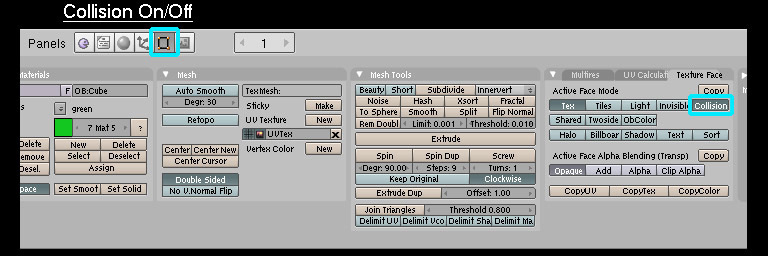
Collision - RWX faces can be set as non-solid on a per face basis by de-selecting the "Collision" Face Mode option in Blender for the active face.
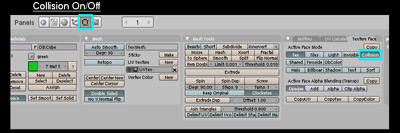
*Note that Non-Collision faces are sent to their own RWX "Clump" which is tagged with the RWX "Collision off" command and thus there will be a shading break between faces with Collision on and those with Collision off. Make sure you use logical visual boundaries when defining face collision.
*The Collision Face Mode Option must be set for every face which you wish to "bump" into in AW.
Download Blender FREE
Other Blender Resources from AWNewsletter:
Introduction to Blender
Modeling Using Blender
Hone your 3D modeling skills with Blender articles in future editions of the AWNewsletter!
|