For a Blender primer, see part 1 of this series: Introduction to Using Blender
Using This Tutorial
Use these prompts to follow along with the tutorial:
Bold items indicate critical steps.
(Parenthesis) in bold indicate key presses.
Italics indicate supplemental or explanatory material.
This tutorial is going to start you off on some simple modeling in Blender. Instead of modeling furniture though, I thought we might try something off the beaten track.
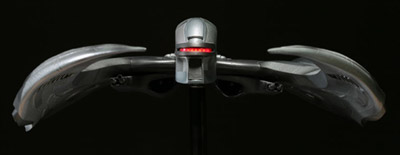
Fig. 1
My first task was to gather a range of pictures from the Internet on our intended subject; in this case, a spaceship. From those pictures I drew rough sketches of the body of the ship and the wings. These aren't necessarily accurate or even to scale, but sketching it out allows me to get an idea of the overall shape of what I'm working with as well as giving me something visually to work from while I'm modeling. Let's take a look at the 3 views I drew of the body piece:
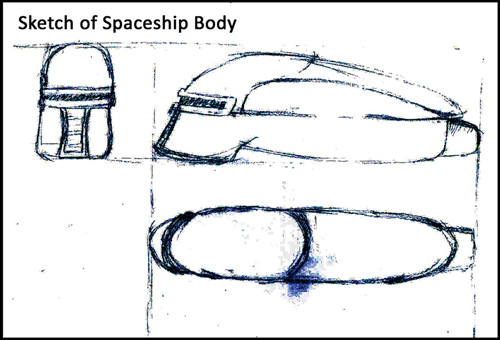
Fig. 2 Click for larger view
I did a front, side, and top view. The shape is rather simple, almost kind of like a bug... with a red moving eye.
Let's review a few of the things you will be learning in Blender this lesson:
Hotkeys:
(Tab) - cycles between Object and Edit Modes
(Spacebar) - numerous menu options, called "Toolbox"
(E) - extrude button
(G) - grab and move option [can be used in conjunction with (X),(Y),(Z) buttons to move along those planes exclusively]
(S) - scale option [can be used in conjunction with (X),(Y),(Z) buttons to move along those planes exclusively]
(R) - rotate option [can be used in conjunction with (X),(Y),(Z) buttons to move along those planes exclusively]
(A) - select all/unselect all
(B) [hit once] - box select
(B) [hit twice] - brush select
(Ctrl)(Z) - undo step(s)
(Ctrl)(Y) - redo step(s)
(W)(1) - subdivide
(W)(2) - subdivide multi
Other tools:
–Use of icons on toolbar
–Hotkeys on numpad for changing views
–Changing view using mouse
–Saving your scene
–Returning your 3D cursor to the center spot (see closing note at end of tutorial)
Alright, we fire up Blender and we're greeted by the default screen we set in the previous tutorial. It has a single cube in it. We're going to use this cube as our building block to start designing the body of our spaceship. Working from the sketch we did for the front view of the ship, let's shape the domed top first.
Hit the (Tab) button to go from "Object Mode" to "Edit Mode" to begin altering this cube. If the cube is pink in edit mode, it means all the faces are currently selected. Unselect them by hitting the (A) key until the cube is gray. Note the toolbar at the bottom of the 3D window (pictured below).

Fig. 3
Depressing the icon button with the 4 dots allows editing of vertices; the double-bar icon allow modification of edges; the icon picturing a triangle allows one to work with faces; and the last icon featuring a cube will, when depressed, allow only vertices, edges or faces that are visible to be selected (when unpressed, you will be able to select vertices, edges, and faces that are in front and in back of an object without having to turn the object).
Make sure this "limit selection to visible" button is depressed and select the "face" icon next to it. Click the (7/Home) button on the numpad to go to the top view of the cube [make sure the NumLock button is "on" to make use of the numpad hotkeys].
Select the top face of the cube and hit the (1/End) key on the numpad to show the front view. Note the top edge is highlighted showing that the top face of the cube is selected. Use the scroll wheel of the mouse to zoom in closer on the cube until a new fainter set of ruler lines appear on the grid screen. Now hit the (E) key to extrude the top face and holding down (Ctrl), move the mouse and slide the new face up 4 units on the grid and left-mouse click to finalize. By using the (Ctrl) button, it locks movements to the grid, which can help keep things precise; not using (Ctrl) will allow for more free-form, imprecise movements.
Now hit the (S) key followed by the (X) key and move the mouse to draw in the top face slightly toward the center to start forming the dome. Use your eye on this one and judge how you think it should slope, then left-mouse click to finalize. If you finalize and then decide you are not happy with the results, use (Ctrl)(Z) to undo the step and repeat the scaling process.
Let's repeat this process once more as we hit the (E) key and hold (Ctrl) moving the new face up 3 more units on the grid and left-mouse click to enter. Hit (S) and (X) and scale the face inward, trying to make it resemble the curve of the dome. When you are satisfied, depress (A) key to unselect everything on the object.
It would be nice to have edges that divide the object in half on the horizontal level. To do this, hit the "limit selection to visible" button again so it is no longer on and select the edges icon from the toolbar. Hit the (B) key once. A cross hair will appear. Click on a position to the left, outside of the object, somewhere slightly above the x-axis and drag to a spot outside the object on the right below the x-axis, releasing the left-mouse button to initiate. The four supporting edges of the cube should now be selected like the picture here:
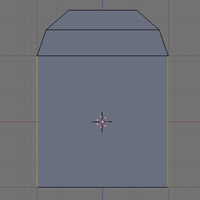
Fig. 4
Because we turned off "limit selection to visible", the selection tool will grab not only the edges in front, but the ones in back that are not directly visible. Hit the (W) key. Select either "Subdivide" from the menu that appears or hit the (1) key. This created a new set of edges around the cubes equator. Deselect with (A), (B) box select, and this time, select all the bottom edges of the cube. Use the (G) key and (Z), and holding (Ctrl) move these edges down 2 units.
In the sketch, the bottom of the craft is slightly flared from the front, so hit (S) scale (X) x-axis to slightly widen the bottom. When finished, deselect everything (A). This is what we should now have.
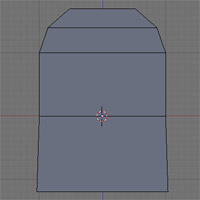
Fig. 5
Vaguely it's starting to take shape. Let's now work from the side view of our sketch.
Hit the (3/PgDn) key on the numpad. This takes us to a side view of the object.
(B) box select all the edges in the center of the object, from top to bottom. Hit (W)(1) which will divide the edges we selected in half, effectively dividing our object down the center with new edges. Deselect (A).
Box select (B) the edges on the left (actually the front of the object since we are looking at it from the side), hit (G)(Y) and holding (Ctrl) slide them further front, say, to the next dark line on the grid (10 small units). Deselect (A), box select (B) the right edges this time, and move them the same as the front ones, just to the back (left). If it looks like you missed some edges, don't panic. What you are seeing is a light source with its attached pole. Ignore that for now.
Let's take a look at our side view on our sketch again. Notice the back end tapers. With those back (right) edges still selected, scale (S) on the z-axis (Z) inward to begin this tapering effect. Notice that the top of the body tapers a lot more on the top than it does underneath. Grab (G) and move downward on (Z) z-axis until it matches more closely with the sketch. Feel free to move and scale the edges until you have the effect you want.
When that's completed, extrude (E) and select "Region" from the drop-down menu that appears. Slide them back to the next dark line on the grid. Repeat scaling and moving to emulate the taper at the back of the spacecraft. Deselect (A) when complete.
Holding down the mouse wheel, rotate the view so that the back faces of the object can be seen. Hit the "limit selection to visible" icon on the toolbar and the "face" icon. Select the top three faces in the back by holding down (Shift) while left-clicking on each face. Holding (Shift) will allow multiple vertices, faces, or edges to be selected at once. You should end up with something like the picture below:
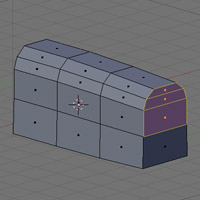
Fig. 6
Go to the side view once more (3/PgDn) and extrude (E) these faces to the next solid line on the grid. Scale and move on the z-axis to make it taper with the rest of the body.
If you find after you are done that you are not satisfied with how it is looking, it's not too late to do some adjusting. I found that when I did the tapering, it was not strong enough on the top of the body. To correct this, I box selected (B) vertices [making sure that the vertices icon was selected in the toolbar and that the "limit selection to visible" was unselected] and manually began shifting vertices to my liking. The picture below shows the body before and after I made the adjustments.

Fig. 7 Click for larger view
Let's focus on the front again. Box select (B) all the vertices in the front. Take a look at the sketch. Not only does the top slope up in this area, but the bottom also rises up as well, so instead of scaling here, just use (G) to move these vertices along the z-axis (Z) until it matches more closely to the sketch.
Now let's continue building on the front. Extrude (E) to the next dark grid line, and extrude once more to the next dark grid line. The top begins to slope downward in this area, but since the bottom does not, box grab (B) sets of vertices on the top and drag them downward (Z) to start forming the dome in the front, until you start having something that looks like this:
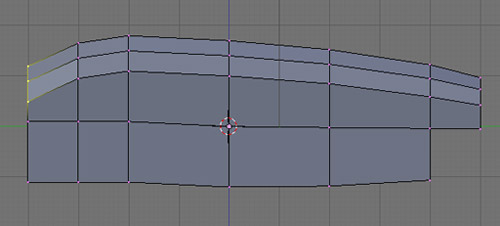
Fig. 8
Note that in the sketch there is a piece that hangs down in the front, almost like a chin. Now would be a good time to add that in. Depress and hold the mouse wheel and spin your view until you can see beneath the front area. Hold down (Shift) and left-mouse select the two bottom front faces. [If you find you have difficulty doing this because of hitting the back faces, depress the "limit selection to visible" icon]. Return to the side view (3/PgDn) and extrude (E) this section down about five small units. We've now created a chin.
Rotate your view again using the mouse wheel so that you can see the front faces. If you find you need to move the view of the window in addition to rotating it, hold down (Shift) while you hold down the mouse wheel and move your mouse in the 3D window. This will allow you to move your view up and down or left and right so you can bring your object into the center again, while just holding down the mouse wheel allows you to rotate.
Click on the "edge" icon on the toolbar and select all the edges in front except for the very top one so that it resembles the picture below:
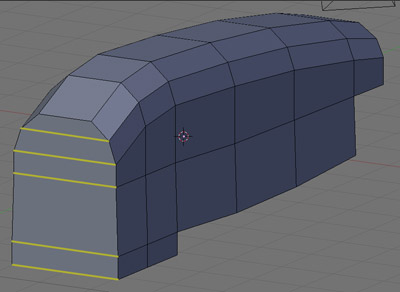
Fig. 9a
It would be nice to have some extra faces and edges up front to work with since this is where the sides start coming together in a cylinder. Taking the edges that are selected and dividing them, not once but twice, will give us the extra area we need.
Hit (W) with (2) this time or select "Subdivide Multi" from the drop-down menu that appears. A box asking "Number of Cuts" will appear. Place the number 2 in there if it is not already present and hit "OK". Remember, "OK" initiates the action. If you do not hit it, it will automatically close the small window and abort the operation.
The selected edges will now be cut in two places, making an extra section up front that can be brought forward. Hit the "face" icon and shift/select the four middle front faces, starting from the bottom.
Go to your side view and use the (G) key to move these forward. Looking back at the sketch, the view from the side does not have a sheer drop in the front like a bus would. It slants more like a ski slope from the dome top. Rotating would come in handy here so hit (R) and slide the mouse until the slope looks similar to the one in the sketch. Axis tip: If the rotation axis is coming from a point other than the center of your selected faces, look on the toolbar for this section:

Fig. 9b
Make sure the icon pictured "Median Point" is selected for the rotation/scaling pivot.
Using the mouse wheel so we can view the object from an angle at the front, it's obvious that it could use a few extra vertices to round things off. Select the vertices shown in the picture below:
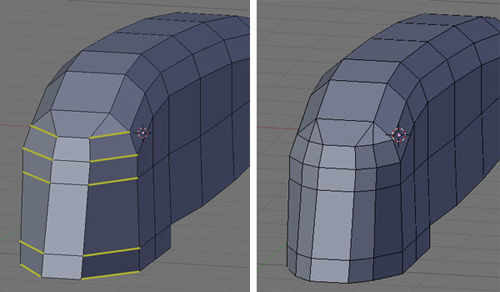
Fig. 10 Click for larger view
Divide them with (W)(1). Shift/select these new edges and in the side view, slide them forward slightly and perhaps rotate (R) them to give the front a smoother, rounded appearance. Our spaceship is starting to look less like a sharp block and more like the form we were hoping for. But there is one more view that wasn't focused on: the top. In the sketch, the top view shows that the body of the ship is almost entirely the same except at the ends where it tapers.
Hit the (7/Home) button on the numpad to show the top view of the object. [View tip: if you need to pan your view in or out, roll the mouse wheel].
The front of our ship matches the sketch pretty well, but the back could use some sculpting. Hold the mouse wheel to shift the view to the back of the ship [you may also have to shift/mouse wheel to move your view up]. Shift/select the 3 upper faces in the back. Return to the top view (7/Home). Scale (S) these faces along the x-axis (X). It may not match up exactly like the sketch, but for now, that's okay. We just want the basic shape.
A composite of the three views of our object:
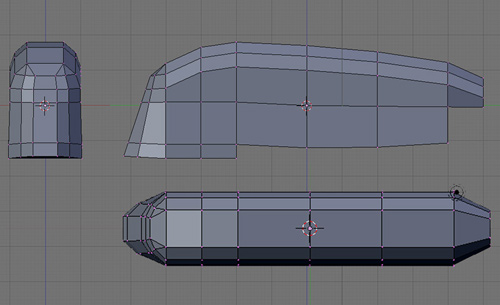
Fig. 11 Click for larger view
I'd say we've done a good job of roughing out the shape of our ship. That means we will be able to move on to the next task of adding details, smoothing the lines, and optimizing our model. That will be the subject of our next tutorial working in Blender.
Save Your Work
If you decide you'd like to do some further experimenting on your own though, by all means forge ahead. In the meantime, save your current scene so we can return to it by hitting F2 or going to the File Tab at the top left of the screen and selecting "Save As" from the drop down menu.
One last note before we wrap up: if you find that you are accidentally clicking the right mouse button and moving the 3D cursor to crazy places (I did this very very very often), it can be returned it to it's 0,0,0 location by clicking "View" on the toolbar, choosing "View Properties" from the drop-up window, and in the box that appears, changing the x, y, and z values for "3D cursor" all back to 0.
User Feedback
If you feel there is a step I omitted or need to explain further, or if there are any questions about something in this tutorial, feel free to email me at stacey@activeworlds.com. Until then, practice your new Blender skills and we'll add to those next month. :)
Download Blender FREE
Hone your 3D modeling skills with Blender articles in future editions of the AWNewsletter!
|