
|
|
Artist's Tip - Creating Terrain TexturesThis month Active Worlds citizen Lady Murasaki, a renowned artist and modeler, shares with us the ins and outs to creating stunning terrain textures for your world. Creating the perfect terrain for your world is not as difficult as it may seem. This is a tutorial for using PaintShop Pro 7 (or Adobe Photoshop with it's similar tools). A basic working knowledge of your program is all that is required. You should be able to do copy and paste, clone brushing, flood fill, and airbrush techniques in particular. Base Textures The first step is deciding what type of terrain you will be using in your world. Will you have rivers, mountains, grassy plains, or deserts? This will help you make decisions as to what you need for your base textures. Will you need a grass texture, sand, gravel, dirt or mud, stone for cliff faces, snow for mountain tops, brick or stone to make pathways for your visitors to follow? Once those choices are made you will need to find or create the texture types you wish to use as your base textures. A good terrain texture is a minimum of 256 x 256 pixels in size, (although some do prefer 512 x 512) and they must be seamless. The texture should tile well on its own. These will be your base textures for creating your transitional pieces. 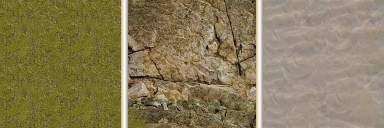 Transitional Textures Say you are planning to have a grass texture as your default for your world, but you also plan on putting in rivers and streams. You will need to create a transitional texture that will create the banks of the stream and yet appear to move naturally from the grass itself. Creating river or streambeds and mountain transitionals. We will be using the 3 base textures above for this demonstration. Begin by opening all of the base textures you plan on using to create your riverbank. Since grass was the default texture, we are going to use that as the base for the transitional piece. Select your paintbrush tool . In tool options make the size around 20 and your Opacity setting 100. This will allow you to paint in your next texture quickly and easily. Load in your texture (we are using the stone here) in Styles. Now go to your grass image and paint in the bank only leaving a slightly irregular and natural looking grass edge at the top and space at the bottom for your sandy beach. It is very important that the left and right sides of the image match each other closely to create a seamless appearance when repeated. 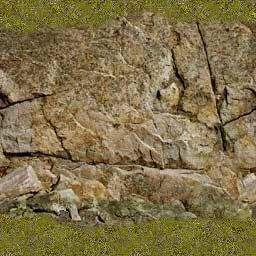 Now load in your sand texture in Styles and paint the beach area in at the bottom. Your image should now look something like this. 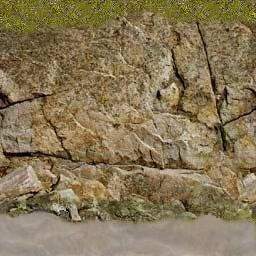 You could further refine your texture at this point by using the flood fill tool with a low tolerance of around 10 and your grass texture to create less of a defining line between grass and stone. In nature, a river or stream has flowing curves and bends. To recreate this with your terrain, you will also need inner and outer curves. Look at the following two images. 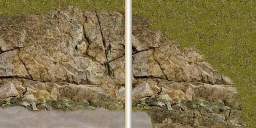 Inner transitional curve 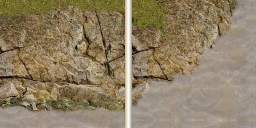 Outer transitional curve These are created the same way as your original riverbed piece. Use your original riverbed texure image to determine where to begin stone and sand on your new transitional piece. Rotate and position the original at sides, top, and bottom of the new image as needed. This is also works quite well for creating transitions from a grassy plain to mountain areas. HINT: The straight riverbed image shown would have a definite repeat pattern to it. By making a minimum of three images with various cracks in the rock cloned out carefully, it would appear less repetitous and more natural. Creating paths. Making pathways for your terrain can be done by several methods. The first is starting again with say a grass texture and hand painting a carefully scaled brick image onto it. Carefully add some of the grass into the cracks between bricks with your flood fill tool on a low tolerance of around 10 to finish the texture. This is an ideal method for a more natural or aged looking path. You will generally need to have a straight piece, a corner, a T shaped section, and a cross piece. Look at the two images below. Other ideas would be to create a fork in a road with transitionals that would carefully match it and curve outward. 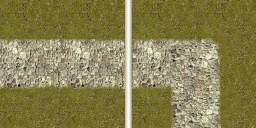 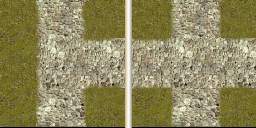 The second method for creating paths or roads would be to use the cut and paste method. This works best for a paved road texture or a formal path that needs precision. The base brick or asphalt texture can be rotated and applied and later touched up with the cloning brush. Finishing your terrain kit. The terrain feature allows for 63 textures total. Once you have created all of your base and transitional textures, organize them and name them terrain0 and upward. Keep in mind that terrain0 will be the default texture for your world's terrain. Placing your road or path textures next in line or whatever series you plan to use most frequently in your world is convenient. You are now ready to upload them to your path and begin sculpting beautiful terrain for your world.
|
| Active Worlds | Newsletter Home | Newsletter Archive | Contact Us | Disclaimer |