

We've come a long way from the days of 1995 when computers didn't even have video cards. Every year, newer and better and faster computers come out which has made it possible for 3D modelers to do a lot more than just a flat 4-triangle wall piece. With all that computer power under the hood, is there really any reason to think about how many polygons make up individual objects we design? The answer is still "yes", and nowhere is that more important than in real-time environments where the users (or players) will be loading things on the fly.
Why do on-line environments find it so important to watch polygon count? Because even though computers have come a long way, not all computers are created equal. There are still people that run on dial-up and there are people with small graphics cards with only 64MB of memory. This doesn't mean that we can't take any risks with 3D modeling and that we have to still build like we are back in 1995. We always want to push the envelope. But remember that the lower your polycount on your 3d models, the smoother your environment is going to run on the widest range of computers. Who doesn't want to appeal to the largest audience possible?
In my last article dealing with real-time environments, we focused a lot on textures and how size plays a part, not just in download time, but in how smooth the user's experience is once all that information is processed and he's moving in Active Worlds. Models are another piece of that whole that can make or break an environment. The definition of a low-polygon model is this: A model in which all efforts have been made during the modeling process to use the minimum number of polygons, which at the end will let users render at the fastest pace. Notice that word "effort". Low-polygon modeling doesn't just happen. It's a constant learning process that hopefully improves and builds the longer you model. I've been at it for 11 years and I'm still discovering new tips and tricks to help me make 3D models that are as efficient as they can be. But it's surprising how little has been written about such an important topic. That's why I'd like to share some of what I've learned with fellow modelers.
Tips for Modeling for Real-Time Environments
Let's start out with a small test. Take a look at this simple object below. What do you think it might be?

When I asked a group of artists what they thought this object might be I got an overwhelming variety of answers. Bottle, club, toy rocket, telescope, root beer, ketchup, flashlight, baseball bat, mini skyscraper, little lighthouse tower were all mentioned as possibilities. The point of the exercise was to emphasize how strong the human reaction is to recognize everyday items in even the crudest and simplest of shapes. It's why humans can see the weeping Virgin Mary in a potato chip, or an elephant in the clouds. It's the most important tool in a low-polygon artist's arsenal: Give people the basic shape of an object and their eye will fill in the rest. The following points add on to this potent piece of information.
1. When starting to create an object, begin with primitives and rough out the relative shape. Then progressively add in details, always keeping track of polycount. Allocate more polygons for large details and fewer polygons for those areas that are small and less noticeable. The important thing is making a model that has the general shape without adding every single ridge, indent, detail, or curve in the actual item.
2. Achieve detail with textures instead of polygons wherever possible. High resolution objects (or high-polygon objects) are created for advertisements and movies. Every detail right down to the screws, windshield wipers, and individual leaves are painstakingly recreated to make something as realistically convincing as the actual thing. This is not a practical way to model for real-time environments. All those polygons would bring movement inside the environment to a grinding halt and are unnecessary. Remember, it's all about giving the impression. For instance, instead of modeling the numbers on a clock face, add them in the texture for the clock. Instead of modeling the ridges in a chinese lantern, incorporate the shading for them in the texture. Let the textures carry the weight of achieving the detail work and breathing life into the model. The results can be stunning without impeding performance.
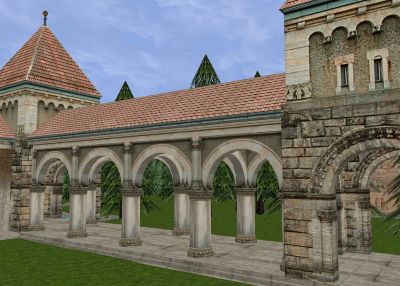
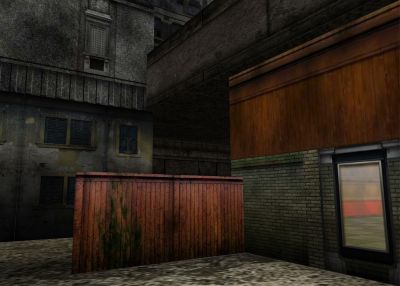
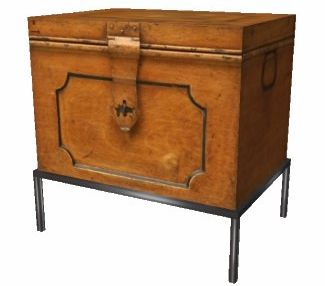
Take a close look at the primitive object shapes used in these pictures and note how rich the texture detail makes them look.
 SH3D2GrungeChestStairsPreviousNext4 of 4
![]()
![]()
![]()
![]()
(Sources of pictures above from first to last: Sh3d2 World in Activeworlds (17.74S 32.96E 2.05a 167); AWEBTS_3 World in Activeworlds (10.69N 57.88E 0.01a 188); Website: Susan 3D: An Activeworlds Resource https://www.susan3d.com/chest07.html; Website: Modeling for Real-Time 3D: https://www.germanium3d.com/modelling/RealTimeModelGuide)
Artist's Trick: Many games will create a high-definition model in order to produce a stunning realistic texture that they then use on a low-polygon model of the same object or creature. It makes the low-polygon object look like it has the definition of a high-polygon object.
3. NURBS are never a low-polygon artist's friend. In re-doing an older environment, we found a horse manure object being used that was done with NURBS. It was over 8,000 polygons for one small poop. A total waste. Enough said. Avoid NURBS.
4. Curved surfaces should be smoothed moderately. This includes anything with spheres, cylinders, and beveled edges. Use icospheres instead of UVspheres wherever possible. A good rule of thumb for cylinders: Use 5 or 6-sided cylinders for thin details, 8-sided cylinders for medium details, and 10 or more sides for large details. Buildings like a barn silo would obviously fall into the latter category. Go as low as you can without ruining the effect. I've used 4-sided cylinders for broom handles and 3-sided cylinders for the horizontal bars on a fence. Look for opportunities to cut polygons in this area and be proud of your cleverness when you do.
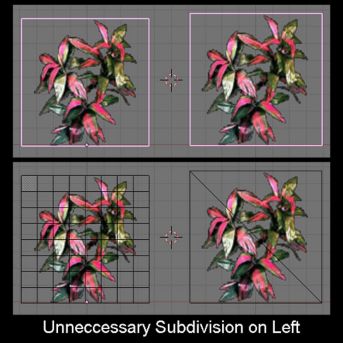
5. Avoid unnecessary subdivisions. Subdivisions are used for lighting, prelighting, and texturing purposes. If none of this comes into play on the model, subdivisions become a waste of polygons.
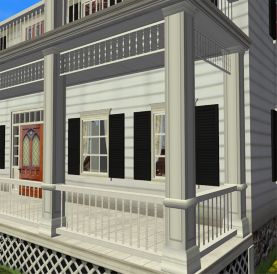
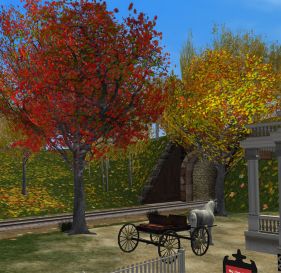
6. One of the greatest polygon savers is the use of masks. This tip is always a trade-off though. Transparencies and masks require more processing power to render. Therefore, the combination of many polygons with masks can cause a heavy hit to performance. But there is no doubt that masks save many polygons when used for items like trees, railings, grills, and even text.
In the pictures below, the railings and trim on the Victorian building and the branches of the trees all save polygons by using masks.
The next two points are artist's tricks that can go a long way.
7. Include only what is visible. Polygons that are on the back or bottom or inside of other pieces of the object should be eliminated. If it's never going to be seen, get rid of it. Develop the habit of cleaning out un-needed polygons at the end of the modeling process. The effort is well worth the reward.
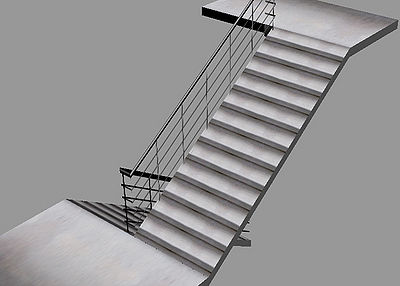
8. The Collision-Off Trick. This trick will improve rendering speed by reducing the number of polygons it has to detect collision on. Classic example is making a stairway with actual steps that you turn the collision off of, and then creating an invisible ramp with collision on that matches the stairway and gets placed in the same position. The rendering engine only has to check for collision on a flat ramp instead of an entire stairway. This trick can be used for multiple purposes. Look for opportunities.
Take into consideration the following points when designing models.
1. How often the item will be used. Lampposts, chairs, and rocks are all items that will probably be used multiple times in the same scene, so keeping them as low-polygonal as possible becomes important. Something like a Christmas tree though will probably be used once as the focal point of the scene so splurging on a few extra polygons here is permissible. Flip the scene though: A winter setting in Narnia. Now the pine trees outnumber the lonely lamppost, so less polygons used on the trees and more used on the lamppost that everyone will focus on. This leaks into the second point...
2. Ask yourself: Is the detail work going to show up, will it even be appreciated? So many objects play a background role instead of a starring role. To model a teacup or sundae with a lot of detail when most likely it will be lost in a sea of other tableware is pointless. People will barely glance at them. They are background support only. Now the Thanksgiving turkey might catch everyone's eye, or the fancy candelabras bookending the turkey, so it might be more important to make them look good. Use polygons on items that will get attention and keep it light on items that won't need it.
3. For those building an entire environment, take into account how active the space will be with moving avatars. Remember, the average avatar has about 1,500 - 2,000 polygons. Multiply that by the number of people that may attend at once to get an idea of the polygons that will be in the environment before any objects are even added. If you are expecting a large crowd all at the same time, you will want to keep your objects as light as possible. The more people that will be there, the more important the polygon count on objects in that environment will become.
We, the artists, look at everything closely, so we sometimes believe everyone else will look just as closely at everything we create. It isn't the case. But as artists, I want to encourage all of you to continue to look closely. Look at video games and environments you admire and try to discover how they made their simple but effective items. Take that knowledge back with you when you model. Never stop discovering ways to improve your skill at low-polygon modeling.
