|
|
|
New Things for Avatars
Courtesy of Stacee
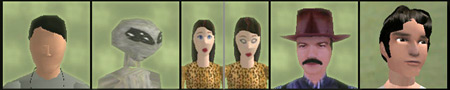
This article is going to be about avatars again. Seems there is a lot
of interest out there about avatars, how to make them, how to use them,
how to make seqs for them. Avatars are enough to cover probably about
2 years worth of Newsletter articles, so here we go with some more info.
By the way, I figure I should throw in here that if anyone out there has
a question that they'd like to see answered in this Newsletter about any
modeling topic, please send it my way, at stacey@activeworlds.com.
For now, let's get on with avatars.
Now, for anyone that doesn't want to know about 4.1....PLEASE, read no
further! That's right, there are going to be a few small 4.1 spoilers
in this article, so if you want to be thoroughly surprised, don't read
this article.
Years back now, tags 32-42 were added into the list of usable tags for
avatars, but it was soon discovered that these new tags didn't work. When
work was started on 4.1, this issue was addressed, and the tags were finally
fixed to work in 3.6, and an additional set was added to work in 4.1.
Therefore here is the list:
1-pelvis
2-back
3-neck
4-head
5-rtsternum
6-rtshoulder
7-rtelbow
8-rtwrist
9-rtfingers
10-lfsternum
11-lfshoulder
12-lfelbow
13-lfwrist
14-lffingers
15-rthip
16-rtknee
17-rtankle
18-rttoes
19-lfhip
20-lfknee
21-lfankle
22-lftoes
23-neck2
24-tail
25-tail2
26-tail3
27-tail4
28-obj
29-obj2
30-obj3
31-hair
32-hair2
33-hair3
34-hair4
35-rtbreast
36-lfbreast
37-rteye
38-lfeye
39-lips
40-nose
41-rtear
42-lfear
(New to 4.1)
43-rtbrow
44-lfbrow
45-rtlid
46-lflid
47-rtcheek
48-lfcheek
49-lip2
50-lip3
51-lip4
52-lip5
53-lip6
54-chin
Note a number of the new tags seem strange ones to add for avatars, since
they deal so much with the face area....skinned
avatars will take advantage of a lot of these tags. But there are a few
of these new tags I do want to talk about ....particularly the ones that
deal with the eyes.
Many would agree that eyes are very expressive on a person. In AW, there
has been a slow evolution of the eyes. First there were...no eyes. Then
we graduated to painted eyes. Someone got clever and made blinking avatars
by way of an animated seqs for the face. And eventually we moved to avatars
that had blinking eyes by way of sequence-animated eyelids. We now come
to the next level of expressive eyes, and it's incredible...eyes that
actually MOVE where you are looking. You've heard of autowalk for the
avatar.dat that modulates an avatar's walking to look more normal. Welcome
to Autolook. This command for 4.1 is going to make it so an avatar will
actually turn in the direction it's looking from the waist up....and this
includes the eyes. So time to whip out these new avatar tags and make
awesome use of them.
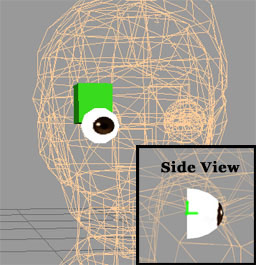
Something that really hasn't been done before is to give avatars separate
eye pieces, or eyeballs. There really was never any need to before. Making
them is easy enough, a round sphere with an eyeball texture mapped on.
Now note that on the side view, we can see that it's only a half-sphere.
By chopping the eyeball in half like that, you save on polygons (faces),
and the less polygons, the better...cuts down on lag. Each eye is only
51 polygons, and no one will see the back of the eye, so flat is just
fine. The axis for the eyeball is marked in green...should be in the middle
of the eye, but lined up with the flat back. Let's use the new tags on
these and mark them respectively aw_rteye and aw_lfeye (tags 37 and 38).
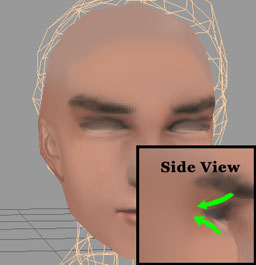
Now, what about the head. You could possibly delete the polygons where
the eye used to be painted on the head and then just let the eye show
up behind there, but this creates a problem....the inside of the avatar's
head is invisible, so you will see the eye but on the spaces around the
eye you will see right through the avatars head into open space. Will
look freaky. A better option would be to do like the picture above. On
the texture for the head, I blanked out the eyes so it looks like they
have none...just the whites of the eyes. Then I indented the vertices
from the eye areas back into the head. Picture taking your fingers and
poking the eye areas on a clay head back into the head...that's what we're
doing on the head model.

Then it's a trick of lining up the eyes and making sure they look normal.
Note the eyeballs overlap the indented eye sockets, this is just what
you want. It might take a bit of playing around with the eye socket areas
and some eyeball resizing, but when it's done, it should look something
like the picture above.

And again, avatars that blink look much more alive then those that don't.
So we'll add some eyelids. These eyelids were made from the eyeball objects
but elongated to fit over them when they blink. I should have chopped
them in half, because again, the back half never comes out of the head...no
one sees them, and that saves on polygons. Have to go back and do that.The
axis for the eyelids is marked in green. I made the eyelash pieces separate
but you don't necessarily have to. You could make it part of the texture.
We'll take advantage of the new tags for 4.1 and name the eyelids aw_rtlid
and aw_lflid (tag 45 and 46).
Okay, how to glue these. Note in the picture at the beginning when we
were making the eyeballs, that there is a green cube behind the eye. Remember
those from the last lesson? This is our hierarchy end. One behind each
eyeball. Click on one of the eyeballs, then click on Glue as Child, and
click on the cube behind it. Repeat with other eye. For the eyelids, since
I made a separate eyelash piece, I can use that in place of a cube. So
I click on an eyelid, Glue as Child, and then click on the eyelash piece.
Repeat for the other eyelid. Then I click on the head. Hit Glue as child,
click on the cube inside the head, click Glue as Sibling, and hit one
eye, second eye, one eyelid, second eyelid, and finally the hair (if any).
Whallah, head is read to be glued to neck.
One last thing that we have to take into consideration is that cobdump3
doesn't know how to convert some of the newer tags
for avatars. Hopefully, that will be updated with the release of 4.1.
In the meantime, you can do it manually in the rwx. Go near the bottom
where it puts the clumps into hierarchies. Look for any named parts that
don't have "Tag x" above the "ProtoInstance aw_namepart"
and then place the appropriate tag number in, like the example below:
ClumpBegin
Translate 0.003 -0.81778 -0.064001
Tag 45
ProtoInstance aw_rtlid
ClumpBegin
ProtoInstance _51
ClumpEnd
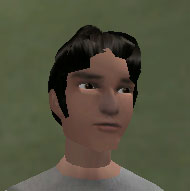
Okay, you now have an avatar that's ready to use in 4.1 with the new Autolook
command, as well as the new blinking seqs made
for the new tags, like this handsome guy below.
| |